


 安装专属采集器
#1. 安装专属采集器
#1.1 部署步骤
#1.1.1 一 网卡配置
需配置宿主网卡参数,NIC_NAME 接受镜像流量的网卡
警告
确保rxvlan、txvlan、lro都关闭。
临时配置:
NIC_NAME="__FIX_ME_NIC_NAME__"
RX_MAX=$(ethtool -g $NIC_NAME | grep "Pre-set maximums:" -A 1 | grep RX | awk '{print $2}')
ip link set ${NIC_NAME} promisc on
ip link set ${NIC_NAME} mtu 2000 # 如镜像口和业务口混用,无需配置此行
ethtool -G ${NIC_NAME} rx ${RX_MAX}
ethtool -K ${NIC_NAME} gso on gro off tso on rxvlan off txvlan off lro off
2
3
4
5
6
持久化配置:
- 编辑网卡配置
vi /etc/sysconfig/network-scripts/ifcfg-${NIC_NAME} - 在文件尾部添加内容
MTU=2000 # 如镜像口和业务口混用,无需配置此行
PROMISC=yes
ETHTOOL_OPTS="${ETHTOOL_OPTS}; -K ${DEVICE} gso on gro off tso on rxvlan off txvlan off lro off"
ETHTOOL_OPTS="${ETHTOOL_OPTS}; -G ${DEVICE} rx 4096" # 参考上面获取的 RX_MAX 值
1
2
3
4 - 保存文件并退出
systemctl restart network重启网络
| 参数 | 解释 |
|---|---|
| promisc on | 开启网卡混杂模式,接收非该网卡数据包。 |
| gso on | 打开 GSO 功能,即开启通用分段卸载。通用分段卸载允许网卡在发送数据包时将多个数据包合并成一个大的数据包,以减少 CPU 的负载。 |
| gro off | 关闭 GRO 功能,即关闭通用接收卸载。通用接收卸载允许网卡在接收数据包时将多个数据包合并成一个大的数据包,以减少 CPU 的负载。 |
| tso on | 打开 TSO 功能,即开启 TCP Segmentation Offload,允许网卡在发送 TCP 数据包时将数据包分段。 |
| rxvlan off | 关闭以太网卡的 VLAN 标记识别功能。目的是让网卡把 VLAN 数据包当成普通数据包处理,不解开 VLAN,如果网卡不是 Intel 的,会不支持该操作 |
| txvlan off | 同上 |
| lro off | 关闭 LRO 功能,即关闭大型接收卸载。大型接收卸载允许网卡在接收数据包时将多个数据包合并成一个大的数据包,以减少 CPU 的负载。 |
#1.1.2 二 采集器组配置
- 在前端页面-系统-采集器-采集器组-新建采集器组
- 在前端页面-系统-采集器-配置-新建采集器组配置
- 修改配置中的
流量镜像方式为物理镜像(2) - 修改采集器组配置,将实际镜像流量的网卡,填入 “基础配置参数”的“采集网口”
- 原有
deepflow-agent.yaml中的tap-mode配置已经不再生效,无需配置 - 记录
采集器组ID供下一步骤使用
#1.1.3 三 部署采集器
rpm 部署:
- 参考 KVM 采集器类型,部署 rpm/deb 采集器包
- 修改
vtap-group-id-request为上面创建的采集器组ID
#1.1.4 采集器注册
- 从 v6.1 开始,专属采集器不再支持自动发现,新部署的采集器需要在页面手动录入。
- 如果采集器已经被自动发现为其他类型,可以手动删除后再进行录入
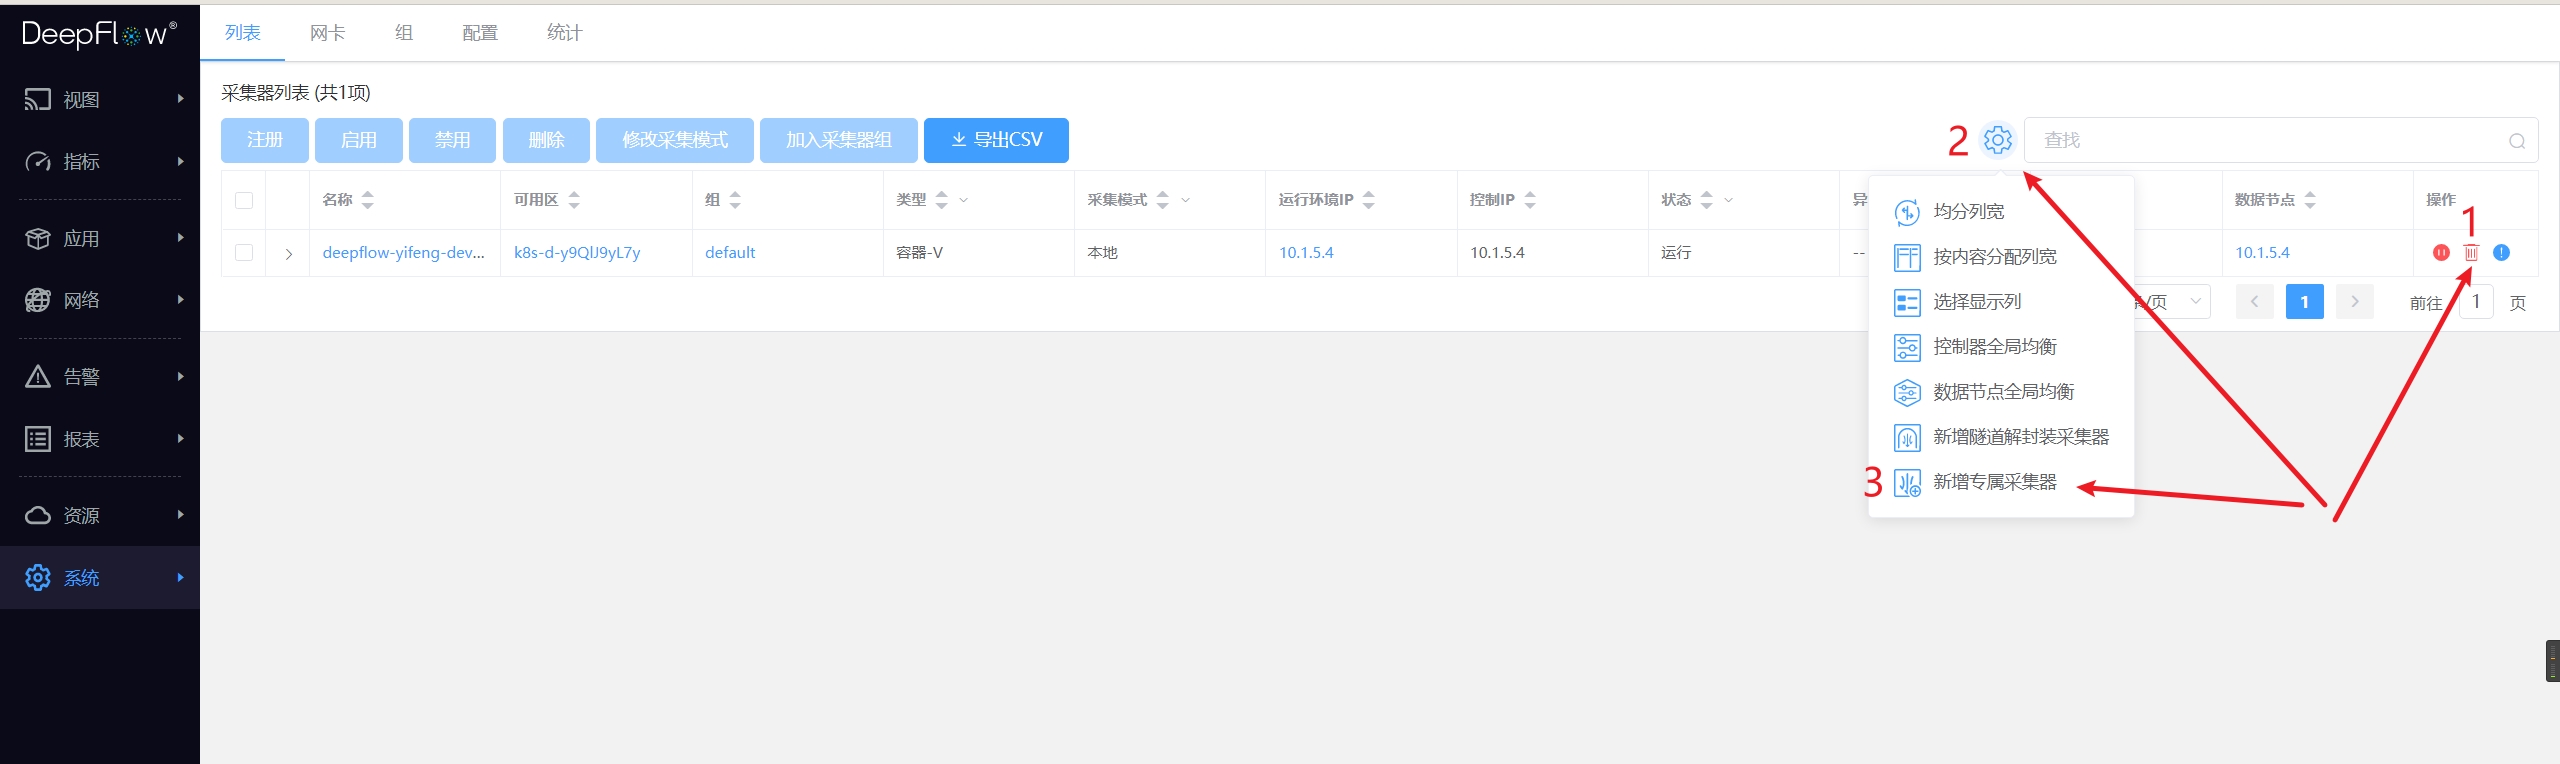
新增专属采集器
#2. 采集配置
资源-其他资源-网络位置:
- 在页面上录入
网络位置信息
采集器组配置推荐:
- 配置
mirror-traffic-pcp为镜像流量VLAN头部的PCP值,只有匹配该值的流量才会根据 VLAN 值标记对应的网络位置- 当镜像流量没有统一的PCP值时,配置
default-tap-type为页面录入网络位置的数据标记值,表示将镜像流量全部归入该网络位置
- 当镜像流量没有统一的PCP值时,配置
- 当采集器接收交换机的ERSPAN镜像流量时,需要显示指定
decap-erspan: true- 推荐:使用
bild提前标记 ERSPAN 隧道头部长度,提升 agent 解封隧道的性能,参考本页下一小节
- 推荐:使用
- 推荐:当镜像虚拟网络(tap-type=3)的流量时,若确认流量没有重复,可通过设置
analyzer-dedup-disabled: true提升性能 隧道解封装配置为正确的 SDN 隧道协议,以展示虚拟网络链路追踪能力- 对于腾讯专有云(TCE)场景,当镜像网关区流量且作为
云网络时,需要配置为TCE GRE
- 对于腾讯专有云(TCE)场景,当镜像网关区流量且作为
警告
流量镜像注意事项:由于QinQ包无法让采集器网卡实现RSS均摊,导致中断集中在一个CPU上,极易发生丢包。流量镜像时请使用VLAN改写的机制,确保镜像流量最多只有一层VLAN。
#3. bild部署和配置[可选]
警告
如果启用bild对采集口做nic_optimize(XDP CPU重定向功能)必须使用RPM部署方式运行采集器进程(不能使用容器部署方式)。这是因为k8s的calico组件使得采集口的xdp程序丢失,使得bild优化失效。
当大流量过大或出现丢包时需要安装 bild,目前 bild 只支持 4.19 版本内核
#3.1 salt环境下部署
部署deepflow时,bild默认处于disable状态。
如需enable bild,需修改/usr/local/deepflow/saltstack/pillar/bild.sls中的bild配置
bild:
  dedicated-trident:
    enable: False
    dst_interface_name_prefix: tap
    dst_interface_count: 8
  trident:
    enable: False
    dst_interface_name_prefix: tap
    dst_interface_count: 1
1
2
3
4
5
6
7
8
9- bild运行在 agent 和 dedicated-agent 节点
- enable: False
- enable/disable bild功能,默认False,如果启用使用True
- dst_tap_interface_name_prefix: tap
- 创建虚拟接口的接口名前缀,默认tap
- dst_tap_interface_count 8/1
- 创建的虚拟接口数量,dedicated-agent 节点默认8个,agent 节点默认1个。
然后将 bild 部署到相应的节点
部署到 dedicated-agent 节点:
# 配置文件更新
salt-run state.orch dedicated_agent_config
# 关闭trident、bild
salt-run state.orch dedicated_agent_stop
# 启动trident、bild
salt-run state.orch dedicated_agent_start
1
2
3
4
5
6部署到trident节点:
# 配置文件更新
salt-run state.orch agent_config
# 关闭trident、bild
salt-run state.orch agent_stop
# 启动trident、bild
salt-run state.orch agent_start
1
2
3
4
5
6
#3.2 容器环境下部署
- 获取bild和iproute安装包
- 从ISO中的
extra-artifaces/df-bild-package获取。
- 从ISO中的
- 安装
yum --disablerepo=* localinstall -y ./{iproute,bild}-*.rpm1
说明:bild对系统包glibc有一定的要求,需要>=2.17-260如果版本过低需要通过yum update glibc进行更新。
- 创建虚接口
- 在文件
/sbin/ifup-local追加下面,添加权限并执行chmod +x /sbin/ifup-local; sh /sbin/ifup-localfor i in {0..7} do /sbin/ip link add tap-bild-$i type dummy /sbin/ip link set tap-bild-$i promisc on /sbin/ip link set dev tap-bild-$i up done1
2
3
4
5
6
- 在文件
- 修改配置文件
/etc/bild.conf(下面举例)ebpf: - src_tap_interfaces: em1 src_direction: 0 dst_tap_interfaces: tap-bild-0,tap-bild-1,tap-bild-2,tap-bild-3,tap-bild-4,tap-bild-5,tap-bild-6,tap-bild-7 dst_direction: 01
2
3
4
5 - 启动bild
systemctl enable bild.service
systemctl start bild.service
1
2 - 修改trident采集接口的配置(修改成上面建立的8个虚拟接口)并重启trident。
#3.3 配置网卡优化功能
根据实际需求可以对网卡做对称哈希,XDP CPU重定向等优化。根据实际情况可以对某个节点单独修改
/etc/bild.conf文件。nic_optimize: - interface: p1p2 rss_channel_count: 1 hi_cpu_list: 2 xdp_cpu_redirect: true xdp_cpu_redirect_list: 5,6,7,8,9,101
2
3
4
5
6以上配置是样例,具体配置含义参照
NIC优化配置章节。某个节点添加配置后,重启bild。
systemctl restart bild
#3.4 配置文件/etc/bild.conf配置选项说明
#3.4.1 配置接口均衡转发
ebpf:
- src_tap_interfaces: lo
src_direction: 0
dst_tap_interfaces: lo
dst_direction: 0
2
3
4
5
- src_tap_interfaces
- 源接口
- 最大支持32个接口
- 接口直接用
,分割且不能有空格、tab等空白字符
- dst_tap_interfaces
- 目的接口
- 最大支持128个接口,因为trident目前最多支持16个接口,所以实际设置接口的数量不要超过16。
- 接口直接用
,分割且不能有空格、tab等空白字符
- src_direction
- 源接口流量方向
- 0: ingress,1: egress
- dst_direction
- 目的接口流量方向
- 0: ingress,1: egress
#3.4.2 NIC优化配置
nic_optimize:
- interface: p1p2
  rss_channel_count: 1
  hi_cpu_list: 2
  xdp_cpu_redirect: true
  xdp_cpu_redirect_list: 5,6,7,8,9,10
2
3
4
5
6
如果不进行网卡优化可注释掉上面配置选项,默认:不启用网卡优化,处于注释状态。
interface
要优化配置接口的名称,如:
interface: p1p2这个接口是src_tap_interfaces中的一个,不能写多个如:
interface: p1p2,p2p1,如果要进行多个接口做优化可以如下配置:nic_optimize: - interface: p1p2 ...... - interface: p1p1 ......1
2
3
4
5
rss_channel_count
- RSS硬件队列数量,数据流在物理网卡上做哈希之后,均摊到多少个队列上并在此队列上发出中断,最大可配置16且不要超过逻辑CPU核数,当启用XDP CPU Redirct时配置为1
hi_cpu_list
- 中断和CPU绑定,值:CPU-ID/CPU-ID列表
- 处理硬件中断的CPU列表或单个CPU,数量最好等于rss_channel_count,但流量较小时一个CPU可处理多个硬件中断队列,当启用XDP CPU Redirct时只需指定1个CPU即可。
xdp_cpu_redirect
- 是否开启XDP CPUMAP redirect功能。值:
true/false
- 是否开启XDP CPUMAP redirect功能。值:
xdp_cpu_redirect_list
- XDP CPU Redirect后处理包的CPU列表
点击查看
注:修改配置文件后,需重启bild才能生效
#4. 业务交换机配置
提示
当需要镜像一个业务交换机所有流量时,推荐对所有接口的出方向进行镜像:
- 避免将多个接口的流量全部镜像到一个镜像口中,采集器收到的流量会有重复
- 避免只镜像所有接口的入方向流量,镜像出方向更有利于判断丢包位置
#4.1 业务交换机镜像配置
# 盛科
monitor session 1 destination interface eth-0-48
monitor session 1 source interface eth-0-1 both

# 华为
observe-port 1 interface GigabitEthernet0/0/1
interface GigabitEthernet0/0/14
  port-mirroring to observe-port 1 inbound
  port-mirroring to observe-port 1 outbound

# Arista
monitor session name source Ethernet 12
monitor session name destination Ethernet 1
2
3
4
5
6
7
8
9
10
11
12
13
#4.2 业务交换机sFlow配置
以华为交换机为例:
- 创建sFlow Agent并配置sFlow Agent的IP地址
- 配置sFlow报文的源IP地址
- 创建sFlow Collector并配置sFlow Collector相关参数
- 配置接口sFlow采样的Collector ID, 并指定接口入方向流量采样
sflow agent ip 10.20.30.40
sflow source ip 10.20.30.50
sflow collector 1 ip 10.20.30.60 udp-port 6343 length 1400
  interface 10GE1/0/1
  sflow sampling collector 1 inbound
2
3
4
5
#4.3 业务交换机NetFlow/NetStream配置
以华为交换机为例:
- 配置流统计信息输出报文的源地址
- 配置流统计信息输出报文的目的地址和目的UDP端口号
- 配置流的活跃老化时间,
推荐设置支持的最小值 - 使能入接口的流量统计功能
- 配置接口的随机报文采样的间隔, 并指定对接口入方向的流量进行采样
netstream export ip source 10.20.30.40
netstream export ip host 10.20.30.50 55555
netstream timeout ip active 1
netstream export ip template timeout-rate 1
interface 10GE1/0/1
  netstream inbound ip
  netstream sampler random-packets 1 inbound
2
3
4
5
6
7
#5. TAP交换机配置
本节描述以普通交换机当做TAP交换机时的配置。
#5.1 H3C交换机
警告
下述参考配置默认使用QinQ的方式为镜像流量打标记,这种方式已从2020年8月开始废弃。原因是QinQ包无法让采集器网卡实现RSS均摊,使得中断集中在一个CPU上导致丢包。新部署的系统,请使用VLAN改写的机制,避免生成QinQ流量。
#5.1.1 基础配置
空配置的H3C交换机只能够通过串口连接, 因此需要RS232接口连接到交换机的Console接口,并设定波特率为9600。
# 进入系统视图
system-view

# 配置MGE接口IP地址
# 注: MGE接口的编号可能随IRF配置的状态而改变

interface M-GigabitEthernet0/0/0
  ip address 172.16.1.130 255.255.0.0
  quit

# 启用SSH Server
ssh server enable

# 添加SSH用户
local-user USER class manage
  service-type ssh
  authorization-attribute user-role network-admin
  password simple PASSWORD
  quit

# 设定vty终端权限
user-interface vty 0 4
  authentication-mode scheme
  user-role network-admin
  quit
2
3
4
5
6
7
8
9
10
11
12
13
14
15
16
17
18
19
20
21
22
23
24
25
#5.1.2 接收业务交换机镜像流量
interface Bridge-Aggregation 2
  quit
interface range Ten-GigabitEthernet 1/0/41:1 to Ten-GigabitEthernet 1/0/41:4
  qos priority 7
  port link-aggregation group 2
  quit
interface Bridge-Aggregation 2
  # 注意在物理口加入聚合组以后,需要刷新聚合口配置
  undo stp enable
  qinq enable
  port access vlan 257
  mac-address mac-learning disable
  quit
2
3
4
5
6
7
8
9
10
11
12
13
#5.1.3 分发业务交换机镜像流量
interface Bridge-Aggregation 1
  quit
interface range Ten-GigabitEthernet1/0/17 to Ten-GigabitEthernet1/0/18
  port link-aggregation group 1
  quit
interface Bridge-Aggregation 1
  # 注意在物理口加入聚合组以后,需要刷新聚合口配置
  port link-type trunk
  port trunk permit vlan 257
  link-aggregation load-sharing mode source-ip destination-ip
  mac-address mac-learning disable
  quit
2
3
4
5
6
7
8
9
10
11
12
#5.1.4 VXLAN配置
可选,仅用于网包分发功能的隧道解封装设备。
# 设置交换机工作在vxlan模式,并配置vxlan隧道模式为二层转发模式
switch-mode 1
undo vxlan ip-forwarding

# 开启l2vpn功能
l2vpn enable

# 配置控制平面VLAN Interface
interface vlan-interface 2
  ip address 172.20.1.53 255.255.0.0

# 创建模式为vxlan隧道的tunnel接口
interface tunnel 1
  source 172.20.1.53
  destination 172.20.1.54

# 创建VSI
vsi vpna
  vxlan 10000
    tunnel 1

# 连接第三方设备的物理接口
interface x/x/x
  service-instance 10000
    encapsulation s-vid xx
      xconnect vsi vpna

# 关闭远端MAC地址自动学习
vxlan tunnel mac-learning disable
2
3
4
5
6
7
8
9
10
11
12
13
14
15
16
17
18
19
20
21
22
23
24
25
26
27
28
29
#5.1.5 其他配置
# 如果需要将40GE光口拆分为4*10GE,请参考如下命令

interface interface FortyGigE1/0/X
  using tengige
  Y
  quit
2
3
4
5
6
#5.2 Huawei交换机
警告
下述参考配置默认使用QinQ的方式为镜像流量打标记,这种方式已从2020年8月开始废弃。原因是QinQ包无法让采集器网卡实现RSS均摊,使得中断集中在一个CPU上导致丢包。新部署的系统,请使用VLAN改写的机制,避免生成QinQ流量。
#5.2.1 基础配置
# 按需更新交换机镜像,以CE交换机为例:

# 在普通模式下可使用dir命令查看文件和flash的剩余空间
dir
# 若空间不足,在普通模式下可使用delete删除文件并reset清理回收站
delete flash:/CE5810EI-V100R003C00SPC600.cc
reset recycle-bin
# 在管理模式下可使用scp从远端服务器上拷贝镜像文件和patch文件到flash
scp root@192.168.18.2:/home/xiangyang/CE5810EI-V200R001C00SPC700.cc flash:/
scp root@192.168.18.2:/home/xiangyang/CE6851HI-V200R001SPH008.PAT flash:/
# 在普通模式下设置启动镜像并重启
startup system-software flash:/CE5810EI-V200R001C00SPC700.cc
startup patch CE6851HI-V200R001SPH008.PAT all
# 在普通模式下检查启动项设置是否正确
display startup
# 在普通模式下重启交换机
reboot

# Hotpatch单独更新方法

# 在管理模式下可使用scp从远端服务器上拷贝Hotpatch文件到flash
scp root@192.168.18.2:/home/xiangyang/CE6851HI-V200R001SPH008.PAT flash:/
# 在普通模式下加载并运行Hotpatch
patch load CE6851HI-V200R001SPH008.PAT all run
# 在普通模式下检查patch信息
display patch-information

# 交换机管理
interface MEth0/0/1
  ip address 172.17.1.100 255.255.0.0

# 配置SNMP
snmp-agent
snmp-agent community read zabbix
snmp-agent sys-info version v2c

# 用户及权限,此部分仅为举例,不同型号的具体配置可能有差异
ssh authentication-type default password
aaa
  local-user admin password cipher the-login-password
  local-user admin privilege level 15
  local-user admin service-type ssh
  # 关闭密码安全性检查
  undo local-user policy security-enhance
  quit

stelnet server enable
ssh user admin authentication-type password
ssh user admin service-type stelnet
user-interface vty 0 4
  authentication-mode aaa
  protocol inbound ssh

# 关闭STP
stp disable

# 打开LLDP
lldp enable
lldp management-address 172.17.1.100  # Management IP

# 使能Netconf API
netconf
  protocol inbound ssh port 830
snetconf server enable
ssh user admin service-type all

# 使能VLAN:打开控制、数据平面用到的所有VLAN
vlan batch 100 256 to 2047

# 确保所有端口已打开jumboframe,即Maximum Frame Length大于9000
display interface | include The Maximum Frame Length is
# 若不大于9000,需要对所有相应的接口执行jumboframe打开的命令
interface 10GE 1/0/1
  jumboframe enable

# 配置统计数据计算间隔
set flow-stat interval 60

# 去使能SSH服务器上的客户端IP地址锁定功能
ssh server ip-block disable
2
3
4
5
6
7
8
9
10
11
12
13
14
15
16
17
18
19
20
21
22
23
24
25
26
27
28
29
30
31
32
33
34
35
36
37
38
39
40
41
42
43
44
45
46
47
48
49
50
51
52
53
54
55
56
57
58
59
60
61
62
63
64
65
66
67
68
69
70
71
72
73
74
75
76
77
78
79
80
#5.2.2 接收业务交换机镜像流量
interface Eth-Trunk2
 port link-type dot1q-tunnel
 port default vlan 257
 port priority 7
 mac-address learning disable
 traffic-policy remark-isp inbound
 quit
interface GE1/0/1
 eth-trunk 2
 quit
2
3
4
5
6
7
8
9
10
#5.2.3 分发业务交换机镜像流量
load-balance profile deepflow-npb
  ip src-ip dst-ip protocol
  l2 eth-type
interface Eth-Trunk1
  # 注意:华为交换机resilient功能存在Bug,暂停使用
  # 仅CE8860-EI/CE7850-EI/CE6850U-HI/CE6851-HI/CE6850-HI支持resilient参数,
  # 其他型号交换机去掉 resilient 关键字即可。
  #load-balance enhanced resilient profile deepflow-npb
  load-balance enhanced profile deepflow-npb
  port link-type trunk
  port trunk allow-pass vlan 257
  mac-address learning disable
  description deepflow-tool-dfi-0
interface 10GE1/0/1
  eth-trunk 1
interface 10GE1/0/2
  eth-trunk 1
2
3
4
5
6
7
8
9
10
11
12
13
14
15
16
17
#5.2.4 VXLAN配置
可选,仅用于网包分发功能的隧道解封装设备。举例:采集器Trident源IP为172.16.1.1,VNI为1024,在172.20.1.53解封装。
#
vlan batch 2 1024
#
interface Vlanif 2
 ip address 172.20.1.53 16
 quit
#
bridge-domain 1024
 l2 binding vlan 1024
 vxlan vni 1024
 quit
#
interface Nve 1
 mac-address learning disable
 source 172.20.1.53
 vni 1024 head-end peer-list 172.16.1.1
 quit
#
2
3
4
5
6
7
8
9
10
11
12
13
14
15
16
17
18
#5.2.5 ECMP配置
假设有两台采集器,其控制ip分别为172.16.0.2和172.16.0.3,虚IP为172.18.0.1 流量分发交换机的ECMP配置方式如下(假设采集流量从GE1/0/15进入):
system-view

interface Vlanif 2
 ip address 172.20.1.1 16
 quit

ip route-static 172.18.0.1 255.255.255.255 172.16.0.2
ip route-static 172.18.0.1 255.255.255.255 172.16.0.3

interface range 10GE 1/0/2 to 10GE 1/0/3
 # 提高控制平面优先级
 port priority 7
 quit

commit
2
3
4
5
6
7
8
9
10
11
12
13
14
15
#5.2.6 其他配置
# 如果需要将40GE光口拆分为4x10GE,请参考如下命令

# 进入系统视图
system-view
port split dimension interface 40GE 1/0/8 split-type 4*10GE
commit
# 进入普通视图
quit
save
# 重启设备生效
reset slot 1
2
3
4
5
6
7
8
9
10
11
#5.3 Centec交换机
警告
下述参考配置默认使用QinQ的方式为镜像流量打标记,这种方式已从2020年8月开始废弃。原因是QinQ包无法让采集器网卡实现RSS均摊,使得中断集中在一个CPU上导致丢包。新部署的系统,请使用VLAN改写的机制,避免生成QinQ流量。
#5.3.1 基础配置
#. 按需更换或升级交换机镜像

# 从远端FTP服务器上拷贝镜像,可使用vsftpd搭建FTP服务器,注意防火墙放开相关端口
ftp mgmt-if 172.16.0.85
ftp> get centecOS-e580-v6.2.22.fcs.r.bin
# 将镜像移动到flash:/boot/下
copy flash:/centecOS-e580-v6.2.22.fcs.r.bin flash:/boot/
delete flash:/centecOS-e580-v6.2.22.fcs.r.bin
# 设置启动镜像并重启
boot system flash:/centecOS-e580-v6.2.22.fcs.r.bin
reboot

# 交换机管理
hostname SW-CRA-Cen35-POD1-PB19-40
management ip address 172.17.1.40/16
service rpc-api enable
# 配置SNMP用于Zabbix监控
snmp-server enable
snmp-server community zabbix read-only

# 使能errdisable自动恢复,避免errdisable被触发后端口一直处于down状态
errdisable recovery interval 30
errdisable recovery reason link-monitor-failure
errdisable recovery reason link-flap
errdisable recovery reason fdb-loop

# 打开全局LLDP和所有端口LLDP
lldp enable
lldp management ip 172.17.1.40
interface eth-0-1
  lldp enable txrx

# 关闭STP
no spanning-tree enable

# 用户及权限
ip ssh server authentication-type password
username admin privilege 4 password ssh-password
line vty 0 7
  # 如果发现没有下面的配置,需要添加配置、保存并reboot
  privilege level 4

# 按需使能VLAN
vlan database
  vlan 100
  vlan 256-2047

# 确保所有端口已打开jumboframe,即Maximum Frame Length大于9000
show interface | include The Maximum Frame Size is
# 若不大于9000,需要对所有相应的接口执行jumboframe打开的命令
interface eth-0-1
  jumboframe enable

# 设置负载均衡字段为IP+协议
port-channel load-balance hash-field-select ipsa ipda ip-protocol
2
3
4
5
6
7
8
9
10
11
12
13
14
15
16
17
18
19
20
21
22
23
24
25
26
27
28
29
30
31
32
33
34
35
36
37
38
39
40
41
42
43
44
45
46
47
48
49
50
51
52
53
54
55
#5.3.2 接收业务交换机镜像流量
interface eth-0-51
  static-channel-group 1
interface eth-0-52
  static-channel-group 1
interface agg1
  description tap-isp-1
  switchport mode dot1q-tunnel
  switchport dot1q-tunnel native vlan 257
  switchport dot1q-tunnel allowed vlan add 257
  switchport dot1q-tunnel allowed vlan remove 1
  mac learning disable

# E580需要额外配置聚合组的每个成员接口
interface eth-0-51
  service-policy type qos input pmap-df-cos
interface eth-0-52
  service-policy type qos input pmap-df-cos

# E350需要额外配置聚合组
interface agg1
  trust port
  cos 7
2
3
4
5
6
7
8
9
10
11
12
13
14
15
16
17
18
19
20
21
22
#5.3.3 分发业务交换机镜像流量
interface eth-0-49
  static-channel-group 3
interface eth-0-50
  static-channel-group 3
interface agg3
  description dfi-0
  switchport mode trunk
  switchport trunk allowed vlan add 257
  mac learning disable
  # 上面一行的命令在E350中配置方法如下,仅供参考
  # switchport trunk allowed vlan add 257
2
3
4
5
6
7
8
9
10
11
#5.3.4 VXLAN配置
可选,仅用于网包分发功能的隧道解封装设备。
# 配置控制平面VLAN Interface
interface Vlanif2
  ip address 172.20.1.53 255.255.0.0
overlay
  source 172.20.1.153
# VLAN 1024至2047关闭MAC学习,由于命令较多,测试环境可按需关闭
vlan database
  vlan 1024 mac learning disable
# 控制平面上行链路:和引流器相连的链路
interface eth-0-1
  overlay uplink enable
2
3
4
5
6
7
8
9
10
11
#5.3.5 其他配置
# COS相关配置(针对CentecOS Software Version 6及以上,即E580):

mac access-list acl-df-cos
  permit src-mac any dest-mac any
class type qos cmap-df-cos
  match access-group acl-df-cos
policy-map type qos pmap-df-cos
  class type qos cmap-df-cos
    set cos 7
2
3
4
5
6
7
8
9